
Views: 220 Author: shunhehandtruck Publish Time: 2025-03-01 Origin: Site


Content Menu
● Understanding the Importance of Tissue Paper in Gift Baskets
● Selecting the Right Tissue Paper
● Considerations for Tissue Paper Selection
● Basic Tissue Paper Folding Techniques
● Advanced Tissue Paper Folding Techniques
● Layering Techniques for a Professional Look
● Incorporating Tissue Paper with Gift Items
● Tips for Specific Types of Gift Baskets
● Troubleshooting Common Issues
● Maintaining Your Gift Basket Presentation
>> Citations:
Gift baskets are a delightful way to present a collection of thoughtful items to someone special. The presentation of these baskets can be significantly enhanced by the proper use of tissue paper. This article will guide you through the process of folding tissue paper for gift baskets, providing you with tips and techniques to create stunning presentations that will impress your recipients.
Tissue paper plays a crucial role in gift basket presentation. It serves multiple purposes:
Filling empty spaces
Creating a visually appealing backdrop
Protecting delicate items
Adding color and texture to the overall presentation
By mastering the art of folding tissue paper, you can elevate the appearance of your gift baskets and make them stand out.
Before diving into the folding techniques, it's essential to choose the appropriate tissue paper for your gift basket.
Color: Choose colors that complement the items in your basket and match the occasion.
Quality: Opt for high-quality tissue paper that won't easily tear or lose its shape.
Size: Ensure you have sheets large enough to work with comfortably.
Texture: Consider using a mix of solid colors and patterned tissue paper for added visual interest.
To efficiently fold tissue paper for your gift basket, set up a clean, flat surface with ample space. Gather all necessary materials, including:
Tissue paper sheets
Scissors
The gift basket or container
Any items to be placed in the basket
Having everything at hand will streamline the process and help you maintain focus on creating a beautiful presentation.
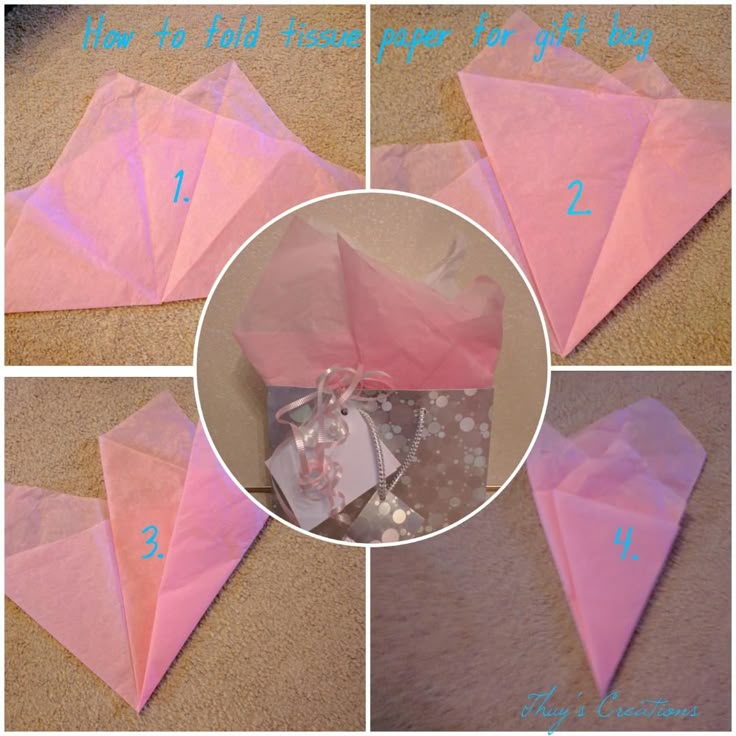
This simple yet effective technique creates a fluffy, voluminous look in your gift basket:
Lay a sheet of tissue paper flat on your work surface.
Pinch the center of the sheet with your thumb and forefinger.
Lift the pinched center and give it a gentle swirl or figure-eight motion.
The tissue paper will naturally form a cone-like shape with ruffled edges.
Place the folded tissue into your gift basket, adjusting as needed.
For a more structured look, try the accordion fold:
Fold the tissue paper in half lengthwise.
Starting from one short end, make small, even folds back and forth, creating a fan-like pattern.
Once fully folded, pinch the center and gently fan out both ends.
Insert the folded tissue into your gift basket, allowing the ends to spread out.
Create an eye-catching spiral effect with this technique:
Lay the tissue paper flat and fold it in half diagonally.
Starting from the folded edge, roll the tissue paper tightly into a thin tube.
Holding one end, twist the tube to create a spiral shape.
Gently pull the spiral apart to create volume and place it in your gift basket.
Add a playful touch to your gift basket with tissue paper pom-poms:
Stack several sheets of tissue paper.
Fold the stack accordion-style, making 1-inch folds.
Tie a piece of string or ribbon around the center of the folded tissue.
Cut both ends of the folded tissue into rounded or pointed shapes.
Gently separate the layers, fluffing them out to create a pom-pom effect.
Place the pom-pom in your gift basket for a burst of color and texture.
To achieve a polished, professional appearance in your gift basket, consider these layering techniques:
Start by lining the bottom of your basket with a solid color tissue paper.
Crumple additional sheets and place them in the corners and along the sides to create a full, rounded shape.
Use the pinch and swirl method to create several tissue paper cones.
Arrange these cones around the perimeter of the basket, alternating colors if desired.
Create a focal point by using a contrasting color or patterned tissue paper.
Fold a sheet using the accordion method and place it in the center of the basket.
Allow the ends to fan out, creating a dramatic effect.
As you arrange items in your gift basket, use tissue paper to enhance their presentation:
Wrap individual items in coordinating tissue paper for a cohesive look.
Use small pieces of crumpled tissue paper to fill gaps between items.
Create tissue paper "nests" for delicate or round objects to sit in.
When working with food items, consider these tips:
Use food-safe tissue paper to wrap edible items.
Create separate compartments using folded tissue paper to prevent items from mixing.
Incorporate colors that complement the food packaging or theme.
For a luxurious spa-themed basket:
Choose soft, pastel colors for a soothing effect.
Use the spiral fold technique to create flower-like shapes with tissue paper.
Wrap bath products in tissue paper for a clean, uniform look.

When preparing a basket for a new baby:
Select gentle, pastel colors or patterns appropriate for infants.
Use the pom-pom fold technique to create playful accents.
Layer tissue paper to create a soft, cloud-like effect around baby items.
To complete your gift basket presentation:
Adjust tissue paper as needed, ensuring an even distribution of color and texture.
Tuck in any loose edges or corners for a neat appearance.
Consider adding a bow or ribbon to the handle or rim of the basket for extra flair.
If your tissue paper tears easily:
Handle the paper gently, avoiding sudden or sharp movements.
Consider using slightly thicker tissue paper for increased durability.
Keep a few extra sheets on hand to replace any torn pieces.
To address an uneven look:
Step back and assess the overall balance of colors and textures.
Adjust tissue paper placement, adding or removing pieces as needed.
Ensure that no single color or pattern dominates the presentation.
Once your gift basket is beautifully arranged:
Store it in a cool, dry place away from direct sunlight to prevent fading.
Avoid placing heavy objects on top of the tissue paper to maintain its shape.
If transporting the basket, consider covering it with clear cellophane to protect the arrangement.
By mastering these tissue paper folding techniques and presentation strategies, you'll be able to create stunning gift baskets that are sure to delight recipients on any occasion. With practice, you'll develop your own unique style and flair for gift basket design, making each creation a true work of art.
Q: How many sheets of tissue paper should I use for a standard-sized gift basket?
A: For a standard-sized gift basket, use 3-5 sheets of tissue paper. However, the exact number may vary depending on the size of your basket and the desired fullness.
Q: Can I mix different colors and patterns of tissue paper in one gift basket?
A: Yes, mixing colors and patterns can create a visually interesting presentation. Just ensure that the colors complement each other and the overall theme of your gift basket.
Q: How do I prevent tissue paper from looking flat or lifeless in my gift basket?
A: Use folding techniques like the pinch and swirl method or accordion fold to add volume and texture. Also, consider crumpling some tissue paper to fill empty spaces and create a fuller appearance.
Q: Is it necessary to use tissue paper for all items in a gift basket?
A: While not strictly necessary, using tissue paper for all items creates a cohesive and polished look. It also helps protect delicate items and fill empty spaces in the basket.
Q: How can I make my tissue paper arrangement last longer?
A: To maintain your tissue paper arrangement, store the gift basket in a cool, dry place away from direct sunlight. Avoid placing heavy objects on top of the tissue paper, and consider using a clear cellophane wrap to protect the arrangement during transport.